pörpör - A-V:n mopoprojektia
pörpör - A-V:n mopoprojektia
Komia "talli" tohon rakenteluun.. Mitenkäs hallitus tykkää gason hajusta sisätilossa? ;D ;D ;) ;)
pörpör - A-V:n mopoprojektia
Komia "talli" tohon rakenteluun.. Mitenkäs hallitus tykkää gason hajusta sisätilossa? ;D ;D ;) ;)
heh heh ;) eipä tuo ole valittanut... ::)
nooh paljastetaan, täähän on mun navetassa - tehty vaan mukavaksi 8-)
'28 Nash Standard roadster 343/M23man
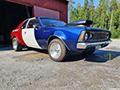
'69 Rebel SST 2D HT 343/M12
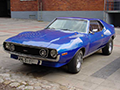
'70 Hornet SST 2D RWB 401/A727
'70 Hornet 2D V8/aut
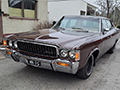
'73 Ambassador Brougham High Speed Pursuit 401/A727
'03 Wrangler Sport 4.0L/aut
'12 Grand Cherokee Ltd 3.0D
'69 Rebel SST 2D HT 343/M12
'70 Hornet SST 2D RWB 401/A727
'70 Hornet 2D V8/aut
'73 Ambassador Brougham High Speed Pursuit 401/A727
'03 Wrangler Sport 4.0L/aut
'12 Grand Cherokee Ltd 3.0D
pörpör - A-V:n mopoprojektia
tuata tuata. naputtelin tossa toiselle foorumille tarinaa tämän kevään harjoittelusta mopon kanssa.. kopsaan suoraan tähän lontooksi... jos kiinnostaa niin tutustukaas ;) "tein ite ja säästin..." :D
-
And back yet again! :) Been quite busy with my cars and the house so the bike has been put on the background a bit in the last half a year or so. However I started on the seat and it's going along 'OK' for my first try at making one from scratch.

So here's what I started with, some sheetmetal, bent straight on the sides and a few hammers. Did not copy the original seat pan as I first thought, because it would have ended up looking too much like the original which I am intent on replacing with something that looks better to my eyes.

After some cutting and again hammering, it slowly dawned on my how much work is ahead, oh well.. I did get started...


I started with getting the general lines of the seat, and then measured how much I'd need to modify it to make it fit from the sides as well...

First 'test-seatings completed', realized it was much too wide, especially in the front so I thought to continue with that...

Tried to minimize the cutting, but...


Ended up cutting the pan into four pieces, it just would not fit right otherwise. But it was getting close to what I wanted, slowly but surely...


After playing around with a 4-piece puzzle, I roughly taped the parts in the right place.

Since I'm no welder, I took a short trip to my mates house and he tacked the 4 pieces together. Well enough so they stick, but stay adjustable. At this time I also realized I'd have to fasten the seat somehow to the frame, so I ended up using the back fender support for the holes which I can bolt thru and from front I kept it simple, just a small piece of 4mm steel which slides under the tank. I did think about using the original seat fastening system where it would stay openable, but no such luck - they were simply too wide for what I was designing - so I had to cut the original seat fasteners off. Pity, but they're intact if I want to revert back to the BIG seat.

And again to my mates house for some welding, this time full on welds not tacking. Also the bolts to the rear, due to the fact that I couldn't reach them after the padding is on. So I will have to remove the rear fender to take off the seat in the future. A price i'll gladly pay.


And after getting a result I was happy with I just grinded the welds, did some test-seating (and you should have seen me smile.. ;) ) and cleaned up the pan of surface rust from storage + applied some black industrial strength paint on it.
So now I had something to sit on, but hmm. Never done any work on padding or leather so... I looked around what I could find in the storage and camping mattress hit my eye. That just might work...

After applying spray glue to the seatpan...

And cutting the camping mattress into a bit more manageable size and also spray glue on that and off to wait 15 minutes for them to cure.


I was suprised how well the camping mattress adjusted to the contours of the seat pan, just enough pressure without ripping it and hold a few seconds and the glue did it's job. I did have to cut a few direct corners and also decided to leave some extra in the front bottom to insulate any possible rattling of metal to metal.


And then the underside... slowly but surely bending it and pushing it to the glue on the backsides. Unbelievable how well it took on.

And after letting it dry for about 2 hours I tested it and realized one mattress was too little so I put on another on top. still trying to decide if I should and a third layer, we'll see....
Next I'm hoping to hit some fabric store and score some fake or real leather to cover it up, same idea basicly, glue and putting it on... ;)
In the last pic you can also see I finally found the mirrors I wanted (and some el cheapo handles I've always had on my bikes) and the rear light jumped to my sight in a local motorcycle store, seems to be close enough to what I wanted so I'll just go with it.


Still mockup phase, we'll see if I end up putting it a bit higher up... Also the rear fender placement is getting close, we'll see more on that next week.
What I'm currently doing are the carbs, based on the mcgregor cleaning manual. Damn that is a good piece of work, never worked on this type of carbs, but it seems to be going well. Second soaking ongoing (first I soaked all parts, cleaned them up and now it's the carb bodies until tomorrow..). I'll post some more maybe tomorrow on them.
Hoping to get the bike on the road for next weekend to a BBQ at a mates place... ::)
-
And back yet again! :) Been quite busy with my cars and the house so the bike has been put on the background a bit in the last half a year or so. However I started on the seat and it's going along 'OK' for my first try at making one from scratch.
So here's what I started with, some sheetmetal, bent straight on the sides and a few hammers. Did not copy the original seat pan as I first thought, because it would have ended up looking too much like the original which I am intent on replacing with something that looks better to my eyes.
After some cutting and again hammering, it slowly dawned on my how much work is ahead, oh well.. I did get started...
I started with getting the general lines of the seat, and then measured how much I'd need to modify it to make it fit from the sides as well...
First 'test-seatings completed', realized it was much too wide, especially in the front so I thought to continue with that...
Tried to minimize the cutting, but...
Ended up cutting the pan into four pieces, it just would not fit right otherwise. But it was getting close to what I wanted, slowly but surely...
After playing around with a 4-piece puzzle, I roughly taped the parts in the right place.
Since I'm no welder, I took a short trip to my mates house and he tacked the 4 pieces together. Well enough so they stick, but stay adjustable. At this time I also realized I'd have to fasten the seat somehow to the frame, so I ended up using the back fender support for the holes which I can bolt thru and from front I kept it simple, just a small piece of 4mm steel which slides under the tank. I did think about using the original seat fastening system where it would stay openable, but no such luck - they were simply too wide for what I was designing - so I had to cut the original seat fasteners off. Pity, but they're intact if I want to revert back to the BIG seat.
And again to my mates house for some welding, this time full on welds not tacking. Also the bolts to the rear, due to the fact that I couldn't reach them after the padding is on. So I will have to remove the rear fender to take off the seat in the future. A price i'll gladly pay.
And after getting a result I was happy with I just grinded the welds, did some test-seating (and you should have seen me smile.. ;) ) and cleaned up the pan of surface rust from storage + applied some black industrial strength paint on it.
So now I had something to sit on, but hmm. Never done any work on padding or leather so... I looked around what I could find in the storage and camping mattress hit my eye. That just might work...
After applying spray glue to the seatpan...
And cutting the camping mattress into a bit more manageable size and also spray glue on that and off to wait 15 minutes for them to cure.
I was suprised how well the camping mattress adjusted to the contours of the seat pan, just enough pressure without ripping it and hold a few seconds and the glue did it's job. I did have to cut a few direct corners and also decided to leave some extra in the front bottom to insulate any possible rattling of metal to metal.
And then the underside... slowly but surely bending it and pushing it to the glue on the backsides. Unbelievable how well it took on.
And after letting it dry for about 2 hours I tested it and realized one mattress was too little so I put on another on top. still trying to decide if I should and a third layer, we'll see....
Next I'm hoping to hit some fabric store and score some fake or real leather to cover it up, same idea basicly, glue and putting it on... ;)
In the last pic you can also see I finally found the mirrors I wanted (and some el cheapo handles I've always had on my bikes) and the rear light jumped to my sight in a local motorcycle store, seems to be close enough to what I wanted so I'll just go with it.
Still mockup phase, we'll see if I end up putting it a bit higher up... Also the rear fender placement is getting close, we'll see more on that next week.
What I'm currently doing are the carbs, based on the mcgregor cleaning manual. Damn that is a good piece of work, never worked on this type of carbs, but it seems to be going well. Second soaking ongoing (first I soaked all parts, cleaned them up and now it's the carb bodies until tomorrow..). I'll post some more maybe tomorrow on them.
Hoping to get the bike on the road for next weekend to a BBQ at a mates place... ::)
'28 Nash Standard roadster 343/M23man
'69 Rebel SST 2D HT 343/M12
'70 Hornet SST 2D RWB 401/A727
'70 Hornet 2D V8/aut
'73 Ambassador Brougham High Speed Pursuit 401/A727
'03 Wrangler Sport 4.0L/aut
'12 Grand Cherokee Ltd 3.0D
'69 Rebel SST 2D HT 343/M12
'70 Hornet SST 2D RWB 401/A727
'70 Hornet 2D V8/aut
'73 Ambassador Brougham High Speed Pursuit 401/A727
'03 Wrangler Sport 4.0L/aut
'12 Grand Cherokee Ltd 3.0D
pörpör - A-V:n mopoprojektia
Sopii satula hyvin kokonaisuuteen!
Iiro
Iiro
pörpör - A-V:n mopoprojektia
Laita keinoeläintä.
pörpör - A-V:n mopoprojektia
Multa varmaan liikenis keino lehmää... mustan väristä...
Iiro
Iiro
pörpör - A-V:n mopoprojektia
tjoo keinoeläimeen oon kallistumassa... ja mustaa on tulossa, mutta hakusessa on semmosta hiukan enemmän tekstuurin omaavaa keinonahkaa (pysyy paremmin pyörän päällä..). Käyn kattelemassa paikallisessa jos löytyy...
'28 Nash Standard roadster 343/M23man
'69 Rebel SST 2D HT 343/M12
'70 Hornet SST 2D RWB 401/A727
'70 Hornet 2D V8/aut
'73 Ambassador Brougham High Speed Pursuit 401/A727
'03 Wrangler Sport 4.0L/aut
'12 Grand Cherokee Ltd 3.0D
'69 Rebel SST 2D HT 343/M12
'70 Hornet SST 2D RWB 401/A727
'70 Hornet 2D V8/aut
'73 Ambassador Brougham High Speed Pursuit 401/A727
'03 Wrangler Sport 4.0L/aut
'12 Grand Cherokee Ltd 3.0D
pörpör - A-V:n mopoprojektia
noniiii. kaasarit tehty, istuin tehty, säädöt tehty, sähköt tehty,vilkut/valot/jne. Eilen yönä käyntiin ja tänäaamuna töihin.. Lievästi sanottuna hyvin onnistunut projekti.. 8-)
Nyt Hornetin kimppuun...
Nyt Hornetin kimppuun...
'28 Nash Standard roadster 343/M23man
'69 Rebel SST 2D HT 343/M12
'70 Hornet SST 2D RWB 401/A727
'70 Hornet 2D V8/aut
'73 Ambassador Brougham High Speed Pursuit 401/A727
'03 Wrangler Sport 4.0L/aut
'12 Grand Cherokee Ltd 3.0D
'69 Rebel SST 2D HT 343/M12
'70 Hornet SST 2D RWB 401/A727
'70 Hornet 2D V8/aut
'73 Ambassador Brougham High Speed Pursuit 401/A727
'03 Wrangler Sport 4.0L/aut
'12 Grand Cherokee Ltd 3.0D
pörpör - A-V:n mopoprojektia
Sain mopon tosiaan ajoon, tässä vielä parit kuvat ja selitykset (lontoota kun ovat copypaste tuuttisivuilta).
----
Carbs, carbs, carbs, carbs... Last stages into it so I took a few shots for you to see..


After this it was only the bench synch and install. Oh ye, found one extra part - all others found their place. See the plastic ring on the bottom right? And no, it's not one of the rings that go to the float discs on top - I have those in place. And no, it's not one of the rubber plugs from the bottom either. No clue, but everything seems to work fine without it... ;)

Here's a couple pics installed with the cleaned up airbox (and new filter inside).

And then onto the seat. I said before, one camping mattress or two didn't cut it, so I cut in a third slice and added some foam as well.

Then cut the fake leather to a more manageable size.


After this sun was fading pretty fast and my working lights really aren't that good for photography I just added glue to both the fake leather and the seat, waited 15 minutes put on the front and same deal with the back. Took a considerable amount of stretching and cursing and this type of fake leather doesn't really work well with heat so I decided to do folds in the back. Not as good as sowing or exact fit vinyl, but should be very durable and feels a lot better than vinyl.

Left it to dry on the kitchen table (too cold outside at night) and put in on first thing this morning before riding to work...

So yeah, it's done! Although as I get some kilometers under it I may make some changes, but this will do for now.
After work today I took a few pics of the bike as it is now. Rear signals are taped on (yes, will figure out something better, but I neeeeed to ride) and exhausts are still the old italo-pipes. But here it is for ya:


Ja tässä aktiiviset apurit koko rempan ajalta....

----
Carbs, carbs, carbs, carbs... Last stages into it so I took a few shots for you to see..
After this it was only the bench synch and install. Oh ye, found one extra part - all others found their place. See the plastic ring on the bottom right? And no, it's not one of the rings that go to the float discs on top - I have those in place. And no, it's not one of the rubber plugs from the bottom either. No clue, but everything seems to work fine without it... ;)
Here's a couple pics installed with the cleaned up airbox (and new filter inside).
And then onto the seat. I said before, one camping mattress or two didn't cut it, so I cut in a third slice and added some foam as well.
Then cut the fake leather to a more manageable size.
After this sun was fading pretty fast and my working lights really aren't that good for photography I just added glue to both the fake leather and the seat, waited 15 minutes put on the front and same deal with the back. Took a considerable amount of stretching and cursing and this type of fake leather doesn't really work well with heat so I decided to do folds in the back. Not as good as sowing or exact fit vinyl, but should be very durable and feels a lot better than vinyl.
Left it to dry on the kitchen table (too cold outside at night) and put in on first thing this morning before riding to work...
So yeah, it's done! Although as I get some kilometers under it I may make some changes, but this will do for now.
After work today I took a few pics of the bike as it is now. Rear signals are taped on (yes, will figure out something better, but I neeeeed to ride) and exhausts are still the old italo-pipes. But here it is for ya:
Ja tässä aktiiviset apurit koko rempan ajalta....
'28 Nash Standard roadster 343/M23man
'69 Rebel SST 2D HT 343/M12
'70 Hornet SST 2D RWB 401/A727
'70 Hornet 2D V8/aut
'73 Ambassador Brougham High Speed Pursuit 401/A727
'03 Wrangler Sport 4.0L/aut
'12 Grand Cherokee Ltd 3.0D
'69 Rebel SST 2D HT 343/M12
'70 Hornet SST 2D RWB 401/A727
'70 Hornet 2D V8/aut
'73 Ambassador Brougham High Speed Pursuit 401/A727
'03 Wrangler Sport 4.0L/aut
'12 Grand Cherokee Ltd 3.0D
pörpör - A-V:n mopoprojektia
Ihan komia, mutta eikös tuo ketjusuoja nyt törrötä ihan liian kauas taakse.